TAMS / Java / Hades / applets (print version): contents | previous | nextUsing the popup-menu
 DescriptionMany editing and viewing operations
in the Hades schematics editor are selected via
the popup menu on the main editor canvas.
The main advantage of using the popup menu is that the editor
can use the screen coordinates of the popup menu origin as
the first coordinate required for the selected operation.
This means that there is less need for lengthy mouse movements,
because an operation can be selected right at its target position
in the circuit schematic.
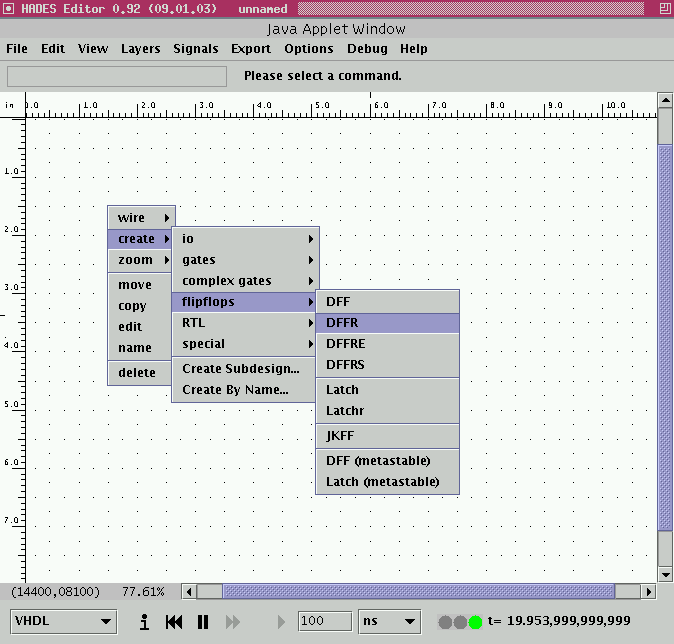
The following screenshot shows an example of the popup-menu
with one of its submenus.
Typically, the popup-menu includes the 'create' submenu
which allows to add new simulation components to your schmematic,
the 'wire' submenu to edit signal wires,
and the 'zoom' submenu.
Select the 'edit' menu on a simulation component to open its
property sheet or its customized editor.
 Note that the popup-menu is not compiled into the Hades software,
but is constructed dynamically during the editor startup phase.
This means that you can create your own customized popup-menu
via changing the value of the "Hades.Editor.PopupMenuResource"
property. Details about why and how to customize the popup-menu
can be found in the
Hades tutorial.
Run the applet | Run the editor (via Webstart)
Impressum | 24.11.06
http://tams.informatik.uni-hamburg.de/applets/hades/webdemos/00-intro/00-welcome/popup_print.html


 DescriptionMany editing and viewing operations
in the Hades schematics editor are selected via
the popup menu on the main editor canvas.
The main advantage of using the popup menu is that the editor
can use the screen coordinates of the popup menu origin as
the first coordinate required for the selected operation.
This means that there is less need for lengthy mouse movements,
because an operation can be selected right at its target position
in the circuit schematic.
The following screenshot shows an example of the popup-menu
with one of its submenus.
Typically, the popup-menu includes the 'create' submenu
which allows to add new simulation components to your schmematic,
the 'wire' submenu to edit signal wires,
and the 'zoom' submenu.
Select the 'edit' menu on a simulation component to open its
property sheet or its customized editor.
 Note that the popup-menu is not compiled into the Hades software,
but is constructed dynamically during the editor startup phase.
This means that you can create your own customized popup-menu
via changing the value of the "Hades.Editor.PopupMenuResource"
property. Details about why and how to customize the popup-menu
can be found in the
Hades tutorial.
Run the applet | Run the editor (via Webstart)