

| |
 Description
This applet demonstrates a serial interface
with a serial terminal connected to the microprocessor system
via the Intel 8251 asynchronous receiver and transmitter chip.
While the
previous applet
demonstrated how to initialize and transmit data via the 8251 chip,
both transmitter and receiver are used in this applet.
Input characters typed in the terminal are received and decoded
by the recever block of the 8251 chip.
An endless loop running on the TinyMips processor regularly checks
the status registers of the 8251 chip,
and reads the data-register whenever the RX_RDY status bit is set.
The character is then written back into the transmitter register
of the 8251, and sent back to the terminal.
This shows both a simple echo application,
and the so-called polling-technique
to check for and handle external events.
The next applet
shows how to generate and use interrupts to react to external events.
Description
This applet demonstrates a serial interface
with a serial terminal connected to the microprocessor system
via the Intel 8251 asynchronous receiver and transmitter chip.
While the
previous applet
demonstrated how to initialize and transmit data via the 8251 chip,
both transmitter and receiver are used in this applet.
Input characters typed in the terminal are received and decoded
by the recever block of the 8251 chip.
An endless loop running on the TinyMips processor regularly checks
the status registers of the 8251 chip,
and reads the data-register whenever the RX_RDY status bit is set.
The character is then written back into the transmitter register
of the 8251, and sent back to the terminal.
This shows both a simple echo application,
and the so-called polling-technique
to check for and handle external events.
The next applet
shows how to generate and use interrupts to react to external events.
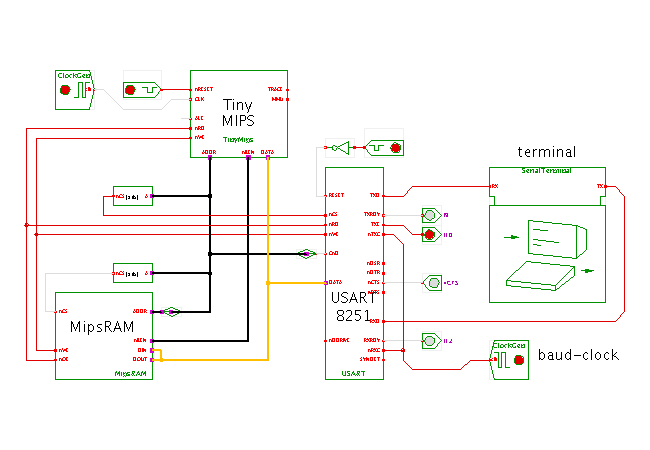
Please check the introductory applet for the introduction and description of the TinyMips processor. The hardware structure used for this applet consists of the processor, some glue logic, a single RAM component that stores both the program and the working set data, and the UART8251 interface chip. See the UART 8251 overview page for details about the asynchronous receiver and transmitter chip. The transmitter output of the terminal (the keyboard) is connected to the 8251 receiver input, while the 8251 transmitter output drives the terminal receiver input (its display). The terminal uses its own GUI window; just click the symbol of the terminal in the schematics to open or close that GUI window.
The bus interface of the 8251 UART is based on a bidirectional 8-bit databus and requires two memory addresses to access the internal on-chip registers. To this end, the MIPS address bus bit A2 is connected to the CnD input of the 8251 UART, which selects between command (CnD=1) and data (CnD=0) transfers. Therefore, command transfers are selected whenever A2 is high, while data transfers are selected when A2 is low. The bidirectional 8-bit DATA bus of the UART is directly connected to the lower eight bits of the MIPS 32-bit data bus. The simulation model of the 8251 ensures that the upper data bits are ignored during write transfers, and are zeroed during read operations.
The address-decoder is set up to activate the UART for the physical addresses 0x00080020 (A2=CnD=0, data transfers) and 0x00080024 (A2=CnD=1, command and status transfers). Again, the static MMU of the TinyMips is disabled, and the virtual addresses used in the program are also the physical addresses that appear on the external address bus. Therefore, the C-program defines the (virtual) base address of the UART to be at location 0xa0080020:
  MIPS virtual address    physical address    UART register
             a008.0200           a008.0200    data
             a008.0204           a008.0204    command/status
The program (see the link below for the full sourcecode) defines a few simple utility functions to write data into the control and data registers of the 8251, and to read the receiver buffer and status register. To initialize the 8251, the functions uartAsyncMode() and uartCommand() are called at program start. The supplied parameters select asynchronous communication with eight databits, two stopbits, and no parity. Also, the clock prescaler is disabled.
The main part of the program first calls the sayHello function once, which outputs a welcome message. Afterwards, the echoLoop function is entered, which repeatly reads the UART status register and stores that value into main memory (at address 0000.1004) - mostly for demonstration and debugging. It then reads the status value again and check for receiver errors via uartHasError. If a receiver error is detected, an errorMessage is printed on the terminal and the error flags are reset via uartResetErrorFlags. Otherwise, another call to uartIsRXRDY checks whether the UART has received a new data character via its RX input line. If so, the data is requested via a call to uartReadData and immediately sent back to the terminal via uartSendCharPolling.
Usage
Wait until the applet is loaded, then click on the symbol of the serial terminal to open the GUI window of the terminal. After the program has completed its initialization sequence, a welcome message will be displayed by the terminal. You should now type a text into the terminal window, and watch the program to process your input and to send the data back. The display (receiver) part of the terminal needs both a carriage-return and a line-feed control character, while the characters transmitted when typing the enter key on your keyboard depend on your operating system (Unix/Linux usually transmit a LF only, while Windows systems generate CR/LF, and other operating systems might still differ).
Not yet implemented: Therefore, the program tries to detect CR and LF keys, and generates the requires CR+LF sequence. The program also checks for overrun (and frame and parity) errors, and displays an error message whenever an error occurs.
Naturally, you can also open the memory-editor (via popup > edit) to watch the memory accesses during program execution. The memory editor highlights the last read operation in green color, and the last write operation in cyan color.
If you want to change the simulation speed, just select 'edit' on the clock-generator component, then edit the value of the clock-generator 'period' property, and select 'apply' (and 'ok' to close the clock-generator config dialog). The default clock rate is slow enough to allow you watching the memory accesses during the main loops of the program.
Similarly, open the TinyMips user-interface window (via popup > edit) to watch the current register values.
The binary program running on the processor was compiled and linked with the GNU gcc (2.7.2.3) and binutils cross-compiler toolchain on a Linux x86 host, with the final ELF loading and relocation done via the Hades Elf2rom tool. See
Run the applet | Run the editor (via Webstart)